Import Your Samples from AKAI MPC Standalone Autosampler
New to the AKAI MPC Autosampler?
Start with these videos to learn how to capture your acoustic and electronic instruments with SampleRobot:
Useful resources:
- MPC Autosampler Tutorial - Tubedigga
- MPC3 Autosampler 8 layers in action - Tefty Music Tech
- MPC One: How to Use Autosampler - Gabe Miller Music
- MPC AutoSampler and Sound Design Mastery - Create Educate Inspire
- MPC Auto Sampler Workflow - Analog on the go! - Create Educate Inspire
- MPC ONE - How To Steal VST or Hardware Sounds! Auto Sampler Tutorial - Ave Mcree
- Revisiting the MPC One Autosampler - Free Beat
- MPC Autosampler Tips - Free Keygroup Programs - Vintage Moog Rogue sampled - Musician Paradise
- MPC One Autosampler + Modular Experiments - Creating sampled instruments with minimal effort! - Tefty & Meems
- MPC Live - Autosampling Eurorack - NearTao
- Auto Sampling Guide - Akai Force and MPC - Joe Filbrun
1. Export the samples from the Autosampler of AKAI MPC Standalone.
File names follow this structure: My Instrument-048 C2 032.WAV
DiViNe Samples supports the following naming rule (regex):
(?<name>.*)-[0-9]{3} (?<key>[A-G]b?_?\\d) (?<velocity>[0-9]{3})
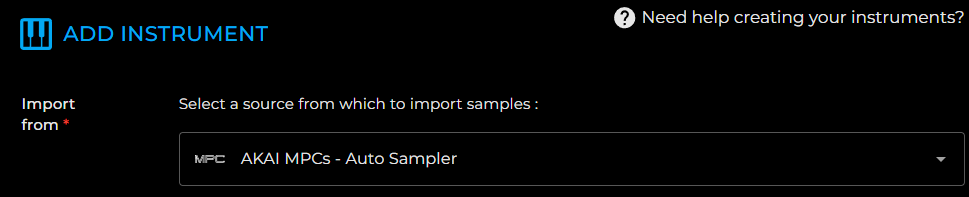
2. Select as Import Source
3. Drag and Drop the Folders Containing Your Samples
3.1. Choose your import options if necessary:
- Normalize each sample: Adjusts the volume level of each sample so that its peak reaches 0dB. ⚠️ this option should be avoided for a multi-sampled instrument
- Extend the note range to the next C: Ensures the note range extends to the note C for the first and last octave of the instrument.
3.2. Drag and drop all your samples into the drop zone.